Saturday, October 20, 2012

Halloween Is Almost Here!

Wow! Time has been marching along while I wasn't looking! I can't believe that today is October 20 already! The trees are beautiful now, boasting reds and golds with greens still mixed in ... and the sky has been that special, cloudless blue that only comes when there's a chilly breeze that seems to sweep everything clean.
It's time to break out the apple cider and the doughnuts! Make oatmeal cookies and pumpkin pies. Take long, quiet walks in the park. Start those knitting projects you've been thinking about. Gather up all the good books you can find and prepare to settle in for breezy days and chilly nights.
As for patterns, maybe you'll finally think about making something whimsical this year ... why not start with some of my simple fall designs? Here are two free patterns perfect for fall:

The Felted Pumpkin In-The-Round
This free pattern is a super-easy, quick knit ... and a great pattern to start with if you've not tried knitting in the round before. Felting, of course, melts away any mistakes! Click here to go to the pattern.

The Felted Thanksgiving Turkey
This is another free pattern from the Mummble-Jummble2 archives! He's kind of rough around the edges, but a very fun, quick knit in the round. His tail, however, is knit back and forth. Click here to go the pattern.

Here are a few more seasonal patterns, available at The Pattern Box:


 Gray Squirrel  Pattern
Click here for the Gray Squirrel. The pattern is only $2.50 and provides all the directions for knitting, felting, stuffing, string jointing and embroidery tips!


Spooky Tree Pattern
Click here for the free Spooky Tree Pattern

Scaredy Cat
The Scaredy Cat pattern is sure to liven up your Halloween table! His body and head are one piece (knitted in the round, so no seams!) His tail, legs and ears are knit separately. His legs are attached by string jointing, so he can move. At $2.50, this cat design is really not so scary, after all! Click here for more information.

Teapot and Tea Cups
As the chilly weather takes over, why not enjoy a pretend cup of tea with this easy-to-knit and felt teapot? Don't forget to knit up the free tea cups and saucers to complete the tea service! Click here for more information.

Friendly Ghost
This little ghost is knit completely in the round, then felted in the washing machine. After he's dry, simple embroidery stitches make him come to life! More information can be found here.

Saturday, August 18, 2012

The Pattern Box Got a Face Lift!

The house is a mess. Papers and clip-art books litter the family room. I haven't cooked a meal in weeks. BUT the newly designed and renovated The Pattern Box was launched around midnight this morning! Please take a moment to visit. I think you'll be glad you did! There are still a few things missing ... some dolls and a few free patterns; a couple of item descriptions; the tips/techniques page; and a few more clip-art decorations. I'll get to those in the next few weeks.

Since I opened The Pattern Box in June of 2008, I had envisioned a website that was fun, colorful and easy to navigate, while incorporating kind of an old-fashioned feeling. I tried my best, but with my limited abilities and time, I ended up with a hodge-podge of over-sized photos and hard-to-read fonts! Yet, I reminded myself, the site was up and it was working. That was good enough.Over the years; however, it became a very small dream that, one day, I'd get to see my website the way I knew it could be ... SO ... I want to publicly thank my very-talented son (okay, and I want to brag about him a little bit, too) ... who used his computer savvy and his graphic-arts genius to re-design my website and create all the fabulous elements that pull it together.
Thank you, Kent! (BIG HUG) It's exactly what I wanted!!

Monday, July 9, 2012

That Was Easy!

Sophie discovered an easy way to get a treat!

Tuesday, July 3, 2012

Join Me for the Christmas Elf Class

Do you need a little Christmas? You're in luck! Cottage Yarn is having Christmas in July classes and guess what??? I will be teaching the Christmas Elf! Participants will receive not only the pattern, but the yarn, too! The two-part class will take place on Thursday evenings, July 12 and July 19, from 6 to 7:30 p.m. Call Cottage Yarn for more information and to sign up (704) 545-8440. Hope to see you there!

Monday, June 11, 2012

Only Six Months to Christmas!

A sneak peak at my new Christmas Elf design


I know summer is just beginning ... but that's the perfect time to get started on quick, little Christmas gifts!
New this year: The Christmas Elf.
My late mother-in-law was a big believer in putting out a ton of her vintage Christmas elves. This one is knitted in the round, then felted in the washing machine. It only takes a few hours from start to finish!

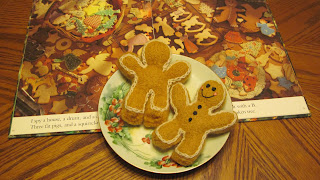
 Everybody loves the Gingerbread Man ... why not knit/felt my little guy and give the book along with it?
Here's a great beverage cozy with a built-in coaster! Perfect for highballs and other festive drinks, the design is a modified quilted lattice stitch with beads.


Stay tuned!

Saturday, May 26, 2012

Aunt Mug's Bed Jacket

With my fascination of vintage (or just plain old) stuff, I searched around on eBay one day and came up with this pattern booklet. It doesn't have a copyright date on it, but from the looks of it, I'd say maybe '30s? or '20s? It's hard to tell. I love the baby clothes ... and the bed jackets! I wonder why bed jackets ever went out of fashion? Maybe people don't do enough sitting up in bed with their morning coffees and newspapers anymore!
At any rate, my wonderful Aunt Mug is scheduled for hip-replacement surgery in June ... on her 81st birthday, no less! So, I decided I'd knit her a bed jacket for her stay in the hospital and the rehab facility ... and why not for home, too, when she gets back?
It was a super easy pattern to follow once I figured out what contemporary size needles and yarn would be equivalent to those listed. I even tried to find vintage skeins of Patons Princess yarn, but couldn't come up with the right thing.
I settled on a US size 10 1/2 needle for the old UK size 1 needle ... and a US size 7 for the UK size 7. They seemed to match the photographs fairly well. I used Cascade Pima Cotton yarn in sort of a seafoam color. I had to teach myself how to crochet the shell edging ... and, as my good friend and knitter/crocheter/embroiderer extraordinare suggested, I really should have doubled the yarn as I worked the shells so that it would end up as heavy as the jacket, itself. Sigh. I ran out of time and left them as they were, only doubling the yarn on the cuffs.
 The old pattern booklet.
 This is what it looks like ...
This is what it's supposed to look like.

All in all, not bad. I hope she likes it ... and that it actually will be a useful gift. (I'm also sending the miniseries of Little Dorrit for when she's sitting in bed, wearing her bed jacket and sipping coffee ... or tea, perhaps.)

Sophie's Park Excursions: Reedy Creek Park

The next park: Reedy Creek Park. This one is off of WT Harris Blvd, right near the Cato Campus of Central Piedmont Community College.

 There are plenty of forks along the paths ... hard to choose which direction to follow!

The sign points to "lakes" ... so there must be many more than this pond we happened upon.
I was here a long time ago when my now-adult children were elementary-school aged. Let me tell you, I'd completely forgotten just how enormous this park is! It's got acres and acres of nature trails for walking. It's got a pond where you can fish. It's got many different areas with swings and playground equipment for the kids ... even one area where everything is made completely from wooden logs. It has a small nature museum where classes are sometimes held. There are lots and lots of picnic-shelter areas and buildings for activities. It also boasts a pretty big fenced-in dog park, although we didn't go inside. The paths are like the Mint Hill Park on Fairview's paths ...wide and bright and easy on the feet. There are so many trails and woods that it can be a little intimidating. The day we went, we just took one path and turned around after awhile and came back.
I've not had nearly enough time to explore everything that this park has to offer. We'll definitely be back!

Sophie's Park Excursions: Mint Hill Park

The next park on the list: The Mint Hill Park on Fairview Road. We really like this park very much. It's super clean. It has a couple of age-defined playgrounds, ball fields, very nice tennis courts and a 3/4 mile nature trail. The trail has a very wide path on which to walk, which makes me feel really good, for some reason. It circles around, so that by the time you're ending the walk, you're just about back where you started.
There are a couple of picnic shelters, but not as many as Idlewild Park. There is also a Frisbee (or Disc) golf course and a few exercise stations posted along the way. It's very easy to get to from 218, off of Highway 51.

 I'm ready! Let's go!
 This sign is a little ominous at first glance, but I guess one should never walk along a nature trail alone.
 Benches are tucked away along the paths. See how nice and wide the paths are? No tree roots here!
 Sophie doing what Sophie loves best: Sniffing!
It's quite tranquil down in the middle of the trail, yet it's not nearly as lonely, dark and dank as Idlewild Park. All in all, this park is really great. We've been back lots of times so far.

Sophie's Park Excursions: Idlewild Park

Our dog trainer said, "A tired puppy is a good puppy." SO, with that in mind, I have been trying to take Sophie for a walk in the park every day. Coincidentally, at the caregiver support group that I attend, we are to make a plan each week to do something that we want to do. It doesn't have to be a big plan, it just has to be something, put down in writing, that we will really try to do for ourselves each week. For instance, I have been meaning to exercise more, but I just never seem to have time. Hey! Guess what? Tiring out Sophie and walking for exercise can be done at the same time! (I just love multi-tasking!)
To make it a little more interesting, I decided I would take Sophie to every park in the Charlotte area. I intend to take a couple of photos and write a little something about each one.
Here's the first: Idlewild Park.
 This park is pretty convenient, as it's only a few miles away.
 Sophie and I were confused by this ... we think someone must have made a mistake. Surely they can't really mean a 6" leash!!! Perhaps they meant a 6' leash!
 It's very dark and damp down in the middle of the nature trail, but Sophie didn't mind it a bit.
 There is a little bit of a creek that's very clear ... and some interesting trees.
 In addition to the nature trail/paths through the woods, this park also has several playground areas with some sort of outdoor padded flooring. There are swings, slides, balance beams, jungle-gym type of things ... along with a Frisbee (or just plain Disc) golf course. There are lots of picnic-table shelters, outdoor grilling areas and a couple of ball fields. There are, of course, rest rooms, too. The park is pretty big. The only negatives we found were the vast amount of bugs (probably from the damp conditions) and lots of tree roots bulging out of the narrow paths. Also, it feels kind of lonely when you're in the middle of the woods. I'd definitely not go alone.
Well, I had a good time!

Let the Wheeless/Walker Project Begin!

I have been all over the place with my knitting lately ... starting a project, then getting an idea for something else and starting that ... ordering tons of books, beads, sequins, sparkly threads, embroidery floss, new yarns I've never used before and the list goes on and on. I don't really have a complete explanation for it, except that I know I want to expand my knowledge base ... and venture out of my comfort zone. I want to try new things and challenge myself just to see if I can do it! Don't get me wrong, I still love designing toys ... and I have been working on a whole batch of new ones.
However, as much as I love toys, I'd also like to experiment with accessories ... from vintage-inspired hats to special hand bags and unique novelties that reflect an earlier era. Beginning this journey, I've been led down a path of learning new stitches and new techniques. Let me clarify that: I should say, new to me, rather ... as these are actually very old techniques and old stitches!  And that's how I came upon the not-so-knew idea of working on swatches. Not just any swatches, mind you, but swatches with a goal. I'm sure you're familiar with Barbara Walker's treasuries of knitting stitches. I recently purchased volumes I, II and III. I love every one. There are so many incredible stitch designs jam-packed into each one, I want to knit them all! And, in fact, when you read the beginning of the first treasury, Barbara insists that these stitches must be knit to be realized. You have to read the book with knitting needles and yarn in hand, trying each out as you go along. And then it hit me! That's exactly what I'm going to do! AHA! And that's when I came up with the Wheeless/Walker Project.
Remember the Julie/Julia Project blog that had the office-worker-by-day Julie Powell cooking every recipe in the Julia Child cook book? Well, I decided, why not take every stitch pattern in each of Barbara Walker's treasuries (starting with the first, of course), and knit it? I don't know if I'll make it all the way through, but why not give it a try? Swatches are small, and fairly quick to finish. (It seems I'm all about small projects these days.) AND wouldn't it be great to have a ton of interesting swatches to design something super special when I'm totally finished??? Or even not! Just take all the swatches and catalog them in a big binder for reference. It would make a great tool, don't you think?
One thing: I am not going to get hung up on correct gauge or blocking or anything else. I'm merely trying every stitch to get the feel of it. This is definitely not going to be a perfectionist kind of project.
If you're interested in more about swatches from other knitters working in the Barbara Walker Treasuries, take a look at The Walker Treasury Project. TONS of participants are knitting their swatches and submitting them to this project. I have to admit, my project somewhat pales in comparison; however, making myself photograph and write a little about each one will encourage me to continue my humble attempts.

Okay: Here goes. I started off on the first entry in the book, which is really four stitch variations in one. The simple garter stitch (all knit), followed by stockinette (knit rows/purl rows), followed by crossed stockinette and, finally, on top, twisted stockinette ... both of these are, as the name implies, using stockinette, only inserting the needle differently (through the back, for instance).
I have used Elle Pure Gold yarn for these first two swatches. If you click on the photo, it will get a little bigger and you can see the stitches a little better. I think I'll choose a different color font next time for the lettering of each separate little patch of knitting.


 You can tell that each patch became tighter and tighter as I went along ... the garter-stitch patch being the most relaxed of all four. If I were to use any of these stockinette variations in a project, I'd have to loosen up. Those twisted stitches are super tight! AAACKK!

The second swatch includes the seed stitch (bottom), the moss stitch and, on top, the double seed stitch. I really like the seed stitch patch a lot. In fact, I can see this stitch being put to good use as borders for things. It looks very rich to me and it's very easy to do. Wouldn't it look nice embellished with beads and/or sequins?
Coming up next: The Sand Stitch and the Dot Stitch (also known as the Spot Stitch). Check back soon for more updates!

Friday, April 6, 2012

Fia's Rose Garden Cardigan Is Finally Finished!

Yes! I finally finished my first grandniece's baby sweater! Sweet, little Fia was born on March 31, 2012. This pattern came from the Entrelac book by Rosemary Drysdale. I was very disappointed with how the pattern was written, as it left out many details that I, as the knitter, had to figure out. I did not appreciate the "reverse shaping" for the opposite side of the sweater, nor did I appreciate the lack of sufficient directions to knit the bottom entrelac band. *sigh* When I write patterns, even the ones I give away for free, I try to write them as if I were sitting next to the knitter, whispering what should happen next. I think the reason many patterns are listed as "for Experienced Knitters" is because the author knows he/she has left out lots of steps. A new knitter, trusting that, after paying the purchase price for the pattern, the complete directions would be included, will (sadly) get frustrated and throw the project down in favor of something "easier" ... when, in fact, the stitches and construction of the item is not too difficult for a beginner at all. How depressing!
At any rate, after figuring out some things on my own and taking tons of notes as I went along, I do think it came out rather well, if I say so, myself!!

The tag makes the whole thing perfect!

I only embroidered eight of the bullion roses ... four on each side of the sweater. The actual pattern has two rows of bullion roses across the entire bottom, one row on each sleeve edge and a couple around the neckline. I like it simple.

Sunday, April 1, 2012

My First Springerle Cookies!

Realizing that Easter is next weekend (NO! How can it be already???), I realized if I wanted to try out my springerle cookie mold for Easter, I better do it today! So, I made my first batch!
I overbaked the second cookie sheet of cookies, as they are not the "hallmark" white on top, but a little golden, instead. Still, all in all, not bad for my first attempt. I hope they taste good! Here is a wonderful website that has the recipes, as well as the molds and flavorings. It's called House on the Hill. There is also a video tutorial, which is extremely helpful.

Saturday, March 17, 2012

Using Embroidery to Decorate the Entrelec Easter Egg

I haven't had a lot of time to work on my projects, as I'm still in the middle of knitting my first-ever baby sweater for my nephew and his wife's soon-expected little one ... BUT I tried to hurry up and decorate one of the entrelac Easter eggs to show some of the simple stitches that can make these eggs as beautiful as Faberge eggs!
I used DMC perle cotton (number 5) in a chain stitch for the border; a bullion rose for the center; and two lazy-daisy stitches for the leaves. Easy peasy!
The eggs make great little canvases for testing out new stitches, too. Try a different stitch for every triangle's border ... or choose the diamond-shapes, instead, to outline. There are loads of great things you could put in the centers ... from crosses and doves ... to spring-time favorites like lady bugs and butterflies.

Tuesday, March 6, 2012

The Entrelac Easter Egg Experiment!

Entrelac Easter eggs with closed tops.
Entrelac Easter egg with open top


If you've ever wanted to experiment with knitting entrelac in the round -- and decreasing as you go -- then this easy knitted/felted entrelac Easter egg is just for you! And this is how it all started ...
You see, I thought it would be fun to experiment with knitting entrelac in the round. So, I gathered my materials and headed to the internet and my book shelves for a few entrelac instructions. No, believe it or not, I'd never tried to do it before. Oh, there were lots and lots of videos and websites and sections in my knitting books regarding the technique of knitting entrelac ... but most were knitted flat. There were a few references that stated it was, indeed, possible to knit entrelac in the round, but then there really weren't sufficient directions to do so. The first couple of times I tried it, I must have picked up stitches in the wrong way, because I came up with cute, little concave pieces that resembled little hoods. (I wrote these wrong directions down for myself to make note of; however, as they could come in handy when making a little doll's hood later!) The best description I found was by Eunny Lang on the Interweave Knitting Daily website and you can download it for free. Even this, though, did not answer all my questions ... in particular, how to decrease as I went along.
All of the patterns and directions reminded me of my great-grandmother's recipe collection. My father confided that if anyone ever asked my great-grandmother for one of her delicious recipes, she'd purposely leave something out so that it could never be prepared just like hers! WELL, each of the entrelac "recipes" left something out so that the technique seemed much more difficult than it really is.
It's my hope that this little egg will get you well on your way to loving entrelac -- and don't worry about any gaps or little mistakes -- they'll melt away in the wash! One of the best parts? From start to finish, this little egg takes less than two hours!
There are two ways to finish the top ... either with live stitches left after finishing the entrelac section, or binding it off as you finish for an open top (perfect for stuffing with a little Easter grass and jelly beans). Visit The Pattern Box for the free pdf download!


Getting ready to pick up the first set of stitches from the base triangles. Be sure to use the right-hand needle and pick up from tip to base.
Continuing with the first rectangle round.

Before Felting

Saturday, February 18, 2012

Can't Believe February Is Almost Over!

Incredible! I can't believe February is almost over already! Where does the time go?? I have TONS of knitting projects I'm working on ... lots of new designs, but I'm afraid I can't share any with you just yet. But don't give up on me! I am experimenting with knitting with beads. The other night, I strung over 400 glass beads on my yarn. It was easy to do with a beading needle and some thread, but PHEW! It took a couple of hours. It will definitely be worth the effort, though! The tiny glass beads were so inexpensive ... what a great way to turn a simple knitted piece into something quite lovely.

Meanwhile, I've been spending a lot of time with Sophie the Puppy. She is finally off of goat's milk completely (I was still putting her kibble in it ... guess you could say, I'm not good at knowing when to quit). And she's learning all kinds of things. Things we accomplished this week:
More training with LEAVE IT. She actually left a Kentucky-Fried Chicken breast on the floor and focused on me, instead!
Getting used to her Mutt Mat. I love this! I just say, "GO TO MAT" and she looks at me for a moment or two and then goes to her mat!!! I tried it outside this morning, but we're not ready for that. Too many distractions ... children laughing; airplane overhead; birds singing; trash cans being rolled up; etc. I have hope, though! Eventually, she's supposed to focus on me and not the distractions.
So much to learn!!!
AND, I just purchased a vintage Nelke doll from eBay. He's in poor shape and, gulp, sadly, he's a clown, too (clowns scare me) ... but I have been searching around for the soft, stockinet dolls of my dad's babyhood for some time now. Evidently, the companies Nelke and Mawaphil were the two for which I've been searching. I'll post a photo of the little guy when he arrives. I'm sure being old and soiled will not improve his creepy clown self, but he is still a little piece of nostalgia.