Tuesday, December 27, 2011

Welcome Our Newest Addition: Sophie!

As you know, our much-loved Bearded Collie, Maggie, went to the Rainbow Bridge in October. After she was gone, I really didn't think I wanted another dog. No dog could possibly measure up to her ... and could we possibly put ourselves through more loss??
As the days went by; however, the emptiness and loneliness I felt was really overwhelming. Randy and I started talking about getting another dog in the spring. In the meantime, I decided, I'd focus on cleaning the house and getting my new knitting designs finished.
As we talked about the possibility of getting a dog, Randy decided that, if and when we ever took that step, we should rescue a dog, instead of buying from a breeder, this time around.
So, without any warning, a week ago, on a quiet Sunday morning, I started looking at Petfinder. I stumbled across this photo:
The description read that this little pup was 6 weeks old and had been rescued from a shelter at 3 weeks old, along with her four little brothers. They were being fed goat's milk and were doing well. The Dad, as they understood it, was a cross between a standard poodle and a labrador and the Mom might possibly have been a beagle. Maybe. All the puppies had nicknames with Doodle in them. This one was "Doodle-Loo."
SO, to make a long story short, Amelia, Kent and I drove down to Aiken, SC in the pouring rain last Wednesday and brought little Doodle-Loo home. She is now known as Sophie and even answers to her name!

Sophie's first visit to our veterinarian's! She weighs 7 pounds.

She loves her bed and crawls up in here all by herself! She is such a good girl and doesn't even cry at night in her crate.
I have TONS of books on puppy training now and, seeing the joy Sophie is bringing to my elderly Dad, I have decided she is definitely going to be a therapy dog (if all goes as planned). She will start her first puppy class in January.
It's a fact that we will always miss Maggie and have a special place in our hearts for her. Do you know what? I think our hearts just get bigger as life goes on ... so we can make room for more.

Sunday, November 27, 2011

Candy Cane Cozy Coaster Pattern: Free!

Knitted/Felted Canada Goose is all dressed up for Christmas! He and the Gingerbread Man like the new Cozy Coaster for their glass of eggnog. Why don't you give it a try, too? Click here for the free pdf download.
It's knit completely in the round on size US 5 (3.75 mm) double-pointed needles, starting at the top. I used a wonderfully stretchy cotton yarn, Cascade Fixation, held together with a thin, glittery strand from Huntingdon Mills metallic yarns. As you can see, there is a built-in coaster right on the bottom!
No seaming necessary! The pattern makes one about 3.5 inches tall by 3.5 inches wide before allowing for stretching. If you have shorter glasses, you can always knit fewer rounds and begin to purl for the bottom earlier. And, of course, you could change your yarn colors to coordinate with your own decor or party theme.
Mrs. Scotty Dog and her baby pup have decided to join the fun!
Here are some great Christmas books to read while you're sipping your eggnog!

Friday, October 28, 2011

Brightcroft Mystic Magpie "Maggie"
November 30, 1997-October 26, 2011


Our beautiful, brown Bearded Collie, Maggie, was diagnosed with Lymphoma on Tuesday afternoon. By Wednesday morning, she could barely walk and was struggling to breathe. Do you know that feeling you get when an elevator drops suddenly? That's how I feel. I miss her so much.

Thursday, October 13, 2011

Second Fall Project: PINS!

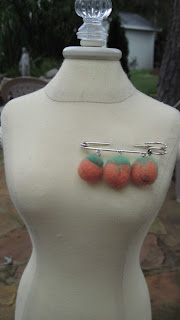
 Here is a really quick, fun way to wear a little bit of Fall! These 2-1/2 inch pins (acorns, above; pumpkins, below) are wet felted, then attached to the pins with a jump ring and a little bit of embroidery floss. Don't be fooled by how large these look on the jewelry mannequin stand! For the step-by-step directions, keep reading!
 For the pumpkin pins, first take a little bit of orange roving and an even smaller amount of green roving. Put the roving in the palm of your hand, keeping the green toward one end. Add a bit of dishwashing detergent and let hot running water thoroughly soak it. Vigorously rub the roving in between the palms of your hands until it forms a solid ball. You'll notice the green will want to stay on the end, just as it should. I guess it knows its place! If you'd rather make the acorn pins, do the same thing, only use shades of brown/gold roving. Use a darker roving for the acorn cap, just as you used the green roving for the pumpkin's top.
After you have the little balls, let them dry. For the acorns, shape them a little bit at the bottom end so they are not quite so round.
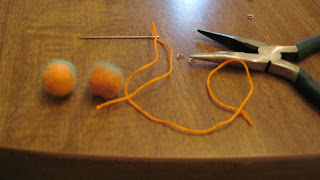
 Once they are dry, you'll need a bit of Number 3 perle embroidery floss in the color you want (or you could just use a double-length of thread), an embroidery needle and a pair of needle-nosed pliers. You'll also need your kilt pin. I bought mine from an eBay seller. You could also just use a safety pin. I also bought a bag of jump rings from Michaels. First, I used the pliers to attach the jump ring to the ring on the pin. If you are using a safety pin, just attach the jump ring anywhere on the pin.
 THEN, thread your embroidery needle and make a knot in one end. Run the needle and thread all the way through the pumpkin or the acorn, from bottom to top. You'll need your pliers to grasp the needle as it emerges at the top. Pull it out, letting the knot catch at the bottom.
 NOW, pull the needle and thread through the jump ring and back into the pumpkin (or acorn), this time from the top down. Pull the needle out at the bottom (again, using the pliers to help). Run it back through again from bottom to top, and again put it through the jump ring. Come back down and pull it out the bottom and, this time, go ahead and trim the floss as close to the bottom as possible. For the acorn, I leave a little bit of floss at the end, beyond my knot, so that it looks like the little point on an acorn. I trim it a little closer on the pumpkin, but the knot looks like the bottom of a pumpkin, so it fits right in!
 Here are some real acorns (very small) and one of my felted ones.
 Did anybody catch the cover of Southern Living this month? I love the display of pumpkins and cabbage and kale! So here's my mini version.
 Aren't the colors wonderful? I also like the variety of pumpkins you can get at the grocery store these days.
Enjoy! If you need any help with the pins, just jot me an email.

Tuesday, October 11, 2011

First Fall Project: Pumpkin Bread!

Okay, I know I've been a little bit slow on getting those promised Fall projects posted. I'm working on some wet felted and needle felted Fall pins ... so stay tuned for those (I think you're going to like them!!!) ... but in the meantime, here's a delicious Pumpkin Bread recipe that will definitely make your house smell delicious while it's cooking ... and then, when you taste this, you won't believe how moist and fabulous it is!
The recipe is Belle's Easy Pumpkin Bread from the Very Best Baking website. You'll find lots of other great Libby's Pumpkin recipes there, too.
 I sprinkled powdered sugar on top and, really, the taste was just fabulous, if I do say so, myself!
The recipe made two loaves. The only change I made was to reduce the oven temperature to 325-degrees F after an hour. It took about 1 hour and 15-20 minutes for them to be completely cooked. I used brown-tinted glass bread pans, which I know you're not supposed to use ... but still, the bread came out perfectly!

Friday, September 23, 2011

It's Official: Fall Has Arrived!

Just in case you were wondering: Fall is here! I'll be back with some fun Fall and holiday projects! Stay tuned!!

Tuesday, September 6, 2011

Cake Pops Part II ... Secret to Success!

Cake pop with coating that is way too thick, lumpy and bumpy.

If you know me very well, you know that I do not give up easily. If you recall, my first attempt at making cake pops a few weeks ago was a complete disaster in appearance (although the taste was still pretty good). If you don't recall, you can scroll down and read that entry below. Anyhow, I decided I'd give the project another try.
The worst part about making these little things is the fact that the Wilton Candy Melts simply will not melt to the luxurious, silky-smooth appearance that the "professional" cake pops have. I have purchased four different cake-pop books and not one of them addresses what to do if your candy does not melt to the right consistency. Believe me, consistency is the ENTIRE thing. If your pops are not dipped properly, you will not get the right surface to decorate. It doesn't matter how cute your designs are or how many sprinkles or colors or edible glitter you may have, if your cake pop is lumpy, bumpy and thickly coated, it simply won't look like the pictures. AND let me also offer this little tid bit, if you paint decorations (i.e., little faces) on your cake pops with cocoa butter as so many books recommend, be aware that the cocoa butter features will smear.
Poor, smeared cocoa-butter features
A blurry close-up of another smeared cocoa butter face.
After searching on google for what to do when your candy melts won't melt, I stumbled upon a discussion group on the Bakerella facebook page and VOILA, the secret is buried on page three of the discussion! The answer! This was posted by a very kind person named Cyndi Moore. Just scroll down the page for her entry.
Add two teaspoons of Crisco solid shortening to one package of candy melts. Add more, if necessary. I ended up adding almost two tablespoons' worth. IT WORKED!
Cake pops coated with candy melts that have shortening in them.
Admittedly, I still need LOTS of practice to get these little things to look like the darling photographs, but now there is hope! At least the candy coating is finally the right consistency.

Wednesday, August 24, 2011

Back to School and Fall Friends


It's that time of year again! School buses are back on the roads. The mornings are considerably darker and, even though it's still August, they've gotten chillier, too. The Canada geese have grown back their feathers and fly, honking, overhead. Soon, the leaves will be changing into their fall colors and the air will be filled with the pungent aroma of burning wood and freshly turned earth.

As Autumn is just around the corner, it's not too early to start planning for Halloween. In honor of the changing seasons, here's a not-so-spooky tree to join our fall friends.

The pattern for Not-So-Spooky Tree is available for free for a limited time at The Pattern Box!

Friday, August 5, 2011

CAKE-POP obsession!!

My very first attempt at making cake pops. They taste very good, although I still need a lot of work on the decorating!


There are LOTS of cake-pop books out there now. Here are a few. My favorite recipe so far is in the book that has not arrived from England yet (but the recipe is free, online).


Cake pops. The name implies a piece of cake on a stick ... and, well, bottom line, I guess they really are cake on a stick. BUT what makes cake pops so incredible are two things: The fact that you mix icing INTO the cake before it gets placed on a stick ... and the fact that you cover the cake completely in a melted candy coating, which you can decorate in any way you can possibly imagine!Cake pops are not really all that new. In fact, they've been around for awhile. Martha Stewart did a show on them, featuring Angie Dudley of Bakerella.com fame, back in April of 2008!! That's right! Three whole years ago!


I hadn't heard of them until a few months ago when my husband brought one home from the office. One of his co-workers had made it. It was wrapped in cellophane and looked cute, but I really had no desire to try it. "A cake pop," I said to myself as I twirled the stick around in my hands. It took me a day or two before my sugar consumption was low and it was the only thing around. One bite and I was hooked. It was delicious. In fact, it was more than delicious. It was just INCREDIBLE. After that introduction, I really didn't think about cake pops too much. I went about my usual routines. I started planning my next big knitting project. (I have two in the works) ... and I'd been suffering from knitting withdrawal. Do you know I haven't knit in earnest since February when I designed Incognito? Sigh. I know. Isn't it terrible when life has so many demands one can't even knit??? Well, the next thing that happened was quite a set back, really. I was outside, weeding, a couple of weeks ago. I got poison something or other ... in a big way. It was so bad, my son said I looked like somebody took a can opener to my arm. Yes, big, lash-like welts were everywhere. It was on both arms, my leg and a patch on my face. The itching was horrific. I couldn't even think about knitting. While I recovered, taking prednisone and slathering on some kind of cortisone cream, my mind turned to cake pops.


I started looking at cake-pop photographs. I started imagining my own kitchen as a sort of cake-pop bakery! YES! I needed candy melts in every color and sprinkles! YES! TONS of sprinkles of all shapes and sizes! I needed fondant and gum paste, cocoa butter for painting, edible glitter and luster dust. The list went on and on ... and suddenly, I had spent over $300 on cake-pop supplies. THEN reality hit. Why, I wasn't going to have a cake-pop bakery! How ridiculous! I was just going to make some for special occasions and to give away. Why, everyone at home was watching his/her weight, anyhow. Why would I start baking tons and tons of cake pops??? What the heck?

It must have been the prednisone taking over my brain, creating some mad steroidal rush!! NOOOO! What have I done? Well, I did the only thing I could do. I started to make them.

I made two batches. One from a recipe from Molly Bakes Cake Pops that is available free online and the other from the Cake Pop Bakery book. And because Molly Bakes Cake Pops is a British-English recipe, I also had to purchase a food scale that would allow me to measure my butter and other ingredients in grams. (Yet another cake-pop purchase!)


Well, both cakes came out tasty (I prefer the Molly Bakes recipe, actually), but I still need lots of work in the decorating category. Okay. Now that cake pops are out of my system, and the poison whatever has only left vague, pink scars, I can go back to knitting. *Audible Sigh*

Thursday, June 23, 2011

A "Very Special" Blog Entry

If you've ever watched a comedy on television and suddenly, without any warning, you get a very special episode, you know what I'm talking about. It's not funny. It either deals with some sad or controversial topic that really has no place in a comedy at all. I usually become very upset with very special episodes, so if you don't want to read this entry, I completely understand! Because ... well, it probably is very special.

You see, my blog has suffered a lot in the last couple of years. I used to try to write entries as if I were still writing my weekly humor column for the newspaper ... poking fun at the little things that happened in my life. But then, all kinds of things that weren't particularly funny started happening. You can't poke fun at dementia and hallucinations or car accidents or broken bones or bacterial infections. At least, not when the people who are suffering from these maladies are your very own family members. It's just not funny.
Somehow, my view of life ... and of death ... totally changed after my Mom passed away last April. It was strange because many beloved relatives had died over the years and it never affected me like my Mom's death. The reality that someone can just "pass away" without any warning ... that one day the person is speaking to you and the very next they are gone ... forever from this life ... that no matter how much you wish you could turn back the clock for just a few hours or a few days and gather all the hugs you possibly could and somehow seal them all up for the rest of your days ... so that you could take them out a little at a time when you needed them most ... you can't. You can't do it. There is no "do over."
As you go about the business of living, you'll find people with similar stories of loss. Suddenly, you'll meet these people everywhere. AND when you least expect it. You'll meet them at the cemetery as they water the grass or the trees or place flowers and trinkets on graves. You'll meet them at the self-storage center when you go to sort through things. You'll meet them in the department store, the grocery store, at the gas station ... wherever. A common thread, I've found, is the need to tell, in very particular detail, the last hours, days or months of the person's life who has died.
I thought I was the only one who had to keep talking about the last two weeks of my Mom's life ... but then I found everyone does it. It occurred to me one day, we need to do it. This need spills out and people who don't normally talk a lot keep talking, words tripping over themselves as they remember those last moments and try to make sense of it.
There is no sense to be made, though, because this is what happens. Life here will end. We will miss our family and our friends who go before we do ... they leave us behind and, although they leave their memories, impressions, likes and dislikes; they leave their special ways and words somehow deep within ourselves, it doesn't make up for the lack of the tangible. Not being able to physically see them, hug them, hold their hands or kiss their foreheads ... is, indeed, painful. We can talk to them all we want to (and believe me, I do!), but we can't ever hear their voices or look into their eyes. Not ever again.
This is when faith has to kick in ... and it wouldn't be "faith" if we didn't have to believe in what we can't see and what we can't understand! Which makes me realize that what we are all striving toward -- eternal life with God -- is the only thing that does make sense! The lack of the tangible we feel at the loss of those we love is only the tip of the "lack" iceberg if we were to be separated from God. Even just to think about this is chilling (no pun intended)!
In the last couple of months -- from April to June -- there have been at least six deaths of friends and relatives. Can you believe it? That is a lot, isn't it? At first, it's almost numbing. What is life all about, anyhow, if all we do is die ... no matter how much we try to treat or fix or cure? But then I remember, as I drag my mind back, that we're not supposed to live forever here. It's only that it seems we should be clinging to this life ... but really we should be shoring up our pathway to eternal life, instead!
There's so much going on in my head that I'd love to be able to get down on paper (even virtual paper) and share with everybody about how intertwined life and faith and death are, but I don't have the right words yet.
So, in the meantime, I'll just say this: While I'm still living, I know I need to make it worthwhile. This doesn't mean I have to succeed at BIG things. I only need to succeed at being a good person. I need to remind myself every moment how important kindness is. How patience matters. How we treat others is all we have to carry us through, because not one of us knows if we'll be here tomorrow.

Friday, May 27, 2011

In Loving Memory ...

My wonderful mother-in-law: Bertha B. Wheeless


July 2, 1926-May 16, 2011


You are greatly missed


I just really haven't allowed myself to think about the passing of my husband's mom. She was a terrific mother-in-law ... full of kindness and caring and generosity. She was witty and outspoken; a fabulous bridge player and the quintessential Avon Lady. She loved people and animals ... Coke with crushed ice ... clip-on earrings ... orange, marshmallow circus peanuts ... and biscuits from Hardee's. She was an avid reader of romance novels, devouring several at a time; getting stacks out of the library! Yet, one of her favorite books was O Ye Jigs and Juleps! (and if you've never heard of it, you should definitely find a copy and read it). She had several copies of it over the years, as she would lend it out and never get it back! She enjoyed the tv-shows Murder She Wrote and Jag and loved old movies: Portrait of Jenny was one of her favorites. She always fixed us a big breakfast, no matter how tired she was and Christmas just wasn't Christmas until we arrived at her house ... and ate her stuffing, onions and squash, biscuits and that deliciously salty country ham. Nobody makes country-fried steak or pork chops like Nana. She was an amazing woman who stayed courageously brave after the untimely death of her husband back in 1984. She had many words of wisdom and love to share with all. I really just can't believe she's gone.

Sunday, May 15, 2011

Go Incognito!

Remember those goofy, plastic nose glasses with the mustache? Well now you can knit your own ... and customize your skin color and mustache while you're at it!


Disguise those fruits and vegetables the fun way!


Here's the silly pattern for you to try! If you'd rather have a pdf version, go to The Pattern Box


Incognito

Copyright 2011 Anita M. Wheeless


SIZE
One size fits all, allowing for the addition of more or less elastic for a perfect fit.

FINISHED MEASUREMENTS
A little over 7 inches from side of eyeglass to the other side of the eyeglass

MATERIALS
For glasses, ear pieces and mustache: Patons Classic Merino; 100% pure wool; 223 yards per 100 gram skein; color: 226 black; 1 skein
For fluffy mustache: Sirdar Foxy Fur; 100% polyester; 44 yards per 50 gram ball; color: Mink; oddment (just enough for the mustache)
For Darker Nose: Ella Rae Classic Merino; 100 % pure wool; 219 yards per 100 gram skein; color: 33; 1 skein
For Lighter nose: Galway; 100% pure wool; 210 yards per 100-gram skein; color: 138; 1 skein

1 set of 5 size US 8/5.0 mm double-point needles
Notions required: Strong black thread; black three-quarter-inch elastic; locking-ring stitch markers

GAUGE
Because item is felted, gauge is not important

PATTERN NOTES
Knitting in the round on both three double-pointed needles and four double-pointed needles. I-cord is used.

PATTERN

Nose: Use 4 double-pointed needles
Knitting back and forth with the double-pointed needles and your choice of nose- colored, wool yarn, cast on 24 stitches onto one needle.
Row 1: Divide by knitting 8 stitches onto each of the three double-pointed needles. Place a stitch marker before the first stitch on the first needle and prepare to join.

Rounds 2-8: Knit these 7 rounds.
Round 9: Needle 1: ssk, k6 (7)
Needle 2: k2tog, k6 (7)
Needle 3: k6, k2tog (7)
Round 10: Knit
Round 11: Needle 1: ssk, k5 (6)
Needle 2: K5, k2tog (6)
Needle 3: k5, k2tog (6)
Round 12: Knit
Round 13: Needle 1: ssk, k4 (5)
Needle 2: k2tog, k4 (5)
Needle 3: k4, k2tog (5)
Round 14: Knit
Round 15: Needle 1: ssk, k3 (4)
Needle 2: k3, k2tog (4)
Needle 3: k3, k2tog (4)
Round 16: Needle 1: ssk, k2 (3)
Needle 2: k2tog, k2 (3)
Needle 3: K2, k2tog (3)
Cut yarn, leaving a long tail. Thread tail through a yarn needle and gather the remaining stitches onto it. Pull tightly to close. Knot off and weave in loose end.


Glasses (make 2) Use 4 double-pointed needles
Knitting back and forth with black wool yarn and the double-pointed needles, cast on 30 stitches.
Row 1: Divide by knitting 10 stitches onto each of three double-pointed needles. Place your stitch marker before the first stitch on the first needle. Prepare to join.
Rounds 2-3: Knit these 2 rounds.
Bind off.
Bridge of the nose: Taking one of the eyeglass rings, pick up 3 stitches simply by inserting one of your needles into three stitches on the outside center of the ring. Knitting back and forth in stockinette stitch,
Row 1: knit
Row 2: Purl
Row 3: Knit
Row 4: Purl bind off
Cut yarn. Using matching black thread, stitch this piece securely to the corresponding place on the other eyeglass ring.

Ear Pieces (make 2) Use 2 double-pointed needles
Take your double-pointed needles and cast on 6 stitches. Make a 40-row I-cord.

Regular Mustache (use 5 double-pointed needles)
Knitting back and forth with black wool yarn and the double-pointed needles, cast on 16.
Row 1: Divide by knitting 4 stitches onto each of 4 double-pointed needles. Place a stitch marker before the first stitch on the first needle and prepare to join.
Round 2: Knit (4 on each needle)
Round 3: Increase in each stitch on each needle. (8 on each)
From now on, you will knit back and forth on each individual needle (separately), finishing one and then starting on the next. Starting with the needle you're on:
Row 4: Purl
Row 5: Knit
Row 6: Purl
Row 7: k2tog, k4, ssk (6)
Row 8: Purl
Row 9: k2tog, k2, ssk (4)
Row 10: Purl
Row 11: k2tog, ssk (2)
Cut yarn, leaving a long tail. Thread tail through a yarn needle and gather remaining stitches on it. Pull tightly to close. Knot off and weave in the loose end.
Repeat the above directions from rows 4-11 with the stitches on each, individual needle.
After all four pieces segments have been knitted, fold them over, so that you have a front and a back, as well as a left and a right side to the mustache. Stitch the sides together using black yarn and a mattress or ladder stitch.

Fluffy Mustache
Wait until after felting. Cut strands of Foxy Fur two times the desired length of the mustache. Fold each strand over and stitch securely under the felted nose.

FELTING

Put the eyeglasses, the ear pieces, the nose and the regular mustache into a zippered lingerie bag. Throw the bag into your washing machine. Sprinkle in a little bit of laundry detergent. Set your washer to the hottest, longest wash with the least amount of water. Set a timer and check your pieces about every five minutes until most, if not all, of the stitch marks have disappeared and each piece is firm and fully felted. The felted ear pieces will each measure somewhere between 6.5 and 7 inches long.
Stretch each ring of the eyeglass over a 2.5 inch round form, such as a glass candle holder, a jelly jar, etc.
Pinch under the nose to form nostrils.
Set the pieces aside to dry, which could take up to several days.

FINISHING

When dry, center the nose under the eyeglasses and stitch securely to both rings and also the little bridge-of-the-nose piece. Center the regular mustache under the nose and stitch securely in place. If you want the fluffy mustache, stitch the strands in place under the nose. Trim, if necessary. Stitch the ear pieces securely to each side. Measure the person's head (or the item, if a fruit or vegetable, for instance) from the end of one ear piece to the other. Cut a piece of black elastic stretched to this measurement. Stitch the elastic securely in place on ear piece, then to the other, joining the ear pieces with it.

I hope you enjoy it! As with all my patterns, if you run into any bumps or trouble spots along the way, please email me and I'll help!


Wednesday, May 4, 2011

May Days!

The fish have come out of their fish cave! YEA!!!


Here are all five of them. Three koi and two comet goldfish.


Aren't these guys wonderful?


Notice the food pellet!


Our back yard is really shaping up this spring. It's so peaceful and a really great place to sit and think and gather yourself together. (Which is what I need to do all the time!) It's also great inspiration for knitting projects. I haven't had the time to knit in SO long that I feel like I'm going to burst! I have so many ideas just bubbling up!!! I can't wait until I finally can sit down with my needles and my notebooks! (And this will definitely be the perfect spot to do so!!!)


I bought about 12 stock plants and put them all around the patio. Their spicy smell is just wonderful. It's a little like dianthus.

Here's Saint Francis waiting for some birds!

The color of this foxglove is just incredible.

Although those pesky canker worms ate all the leaves off the cherry trees, the blueberry bushes are still hanging in there. Only about a cupful of green berries are growing this year.


I planted some phlox and some English daisies, too. This little spot is going to be a tiny fairy garden!


Saturday, April 16, 2011

My First Book Signing!

Here they are! All the characters together for our first book signing! I had so much fun at Cottage Yarn today! Thank you Sara and Grace for mking me feel so special! And thanks to all who came out, even during the terrible rain storm! I had the opportunity to meet such warm and enthusiastic people!

Tuesday, April 5, 2011

Storybook Dolls to Knit is Available: Really! It IS!


I was absolutely ecstatic to get my hands on my very first copy of Storybook Dolls to Knit!!! I hope you will be, too! Despite the snafu with Barnes and Noble and Amazon.com, who seem to think it's out of print already, it's available, really, it is! I'll be back with more details soon! And I've ordered a case of them, myself, which will be available on my website as soon as they come in ... and if you want me to autograph it, just let me know! As with all my designs, I will be here for help if you should run into any bumps or trouble spots while knitting, felting or embroidering.

Oh! One thing that made me so happy: There are step-by-step instructions for my designs ... including the embroidery! The cd of the stories is fabulous, too! The narrator is terrific! I do so hope you'll give these designs a try. I know you'll be glad you did!


Tuesday, February 15, 2011

Day-After Valentine's Feast!

I LOVE these Russel Stover Caramel-Marshmallow candies.
Just look inside!

This is what happens the day-after Valentine's Day! GO! GO now and buy yourself a bagful! Drugstores usually have them 50% by now, but you have to sort through the box. Don't be fooled by the coconut hearts or the plain caramel ones or even the plain marshmallow ones. Only the caramel-marshmallow combination will do!

Saturday, January 22, 2011

I'm half-a-century old!


I am blowing out my 50 candles! (Well, just two actual candles ... with the "50" sentiment!) I had a cupcake in there, smothered with ice cream and fudge sauce. YUM.


Here is my birthday present! A vintage (somewhere in the 1960s) Candyland game! Complete with the ICE CREAM FLOAT card! (Which was my all-time favorite!)

I realized the other day that I really haven't been posting anything for awhile. It's not that I don't want to ... in fact, there are TONS of things going on ... even little silly things every day that might get a chuckle or two, but there just doesn't seem to be any time to take decent photos ... and really, let's face it, even a funny post needs a photo or two. Even though these photos aren't very good, at least there's something to look at while you read. Anyhow, yes, my birthday was the big one this year. The one where now I am starting to receive the AARP magazine in the mail! (How did they know how old Randy and I are, anyhow???) I can't believe it, myself, as I still feel the same as I did 20 years ago. My brother and I were reminiscing about how, when we were little, my Dad would talk about World War II ... and we thought that was ANCIENT history, but in reality, it had only been 25 years or so. Now, to think that I graduated from college 28 years ago is really shocking! But, there it is!