Sunday, January 28, 2024

Take-Along Sun Has Gone International!

Bain de Soleil

Christhalinette has paid me the ultimate compliment of translating the Take-Along Sun pattern into French! Please take a look at her blog and see the Bain de soleil. How lovely the pattern is written in the French language! And while you're there, look at her wonderful projects! She's inspiring!
It's so exciting for me to know that people all over the world are enjoying my patterns. I feel a little sunny glow, myself!
Thank you, Christhalinette!!!!

Sunday, January 31, 2021

 Hello!!!

It has been a really, really long time since I last wrote on this blog and I'm definitely hoping that will change this year! As it turns out, there have been so many life-changing events in the last several years that's it's been really hard to keep up. It's difficult to spend creative time/energy on new patterns ... and it's also difficult to actually find the time to sit down and write. Again, I'm determined to do both!

I made a few changes in the last couple of weeks ... I gave up my Shopify website. Although I am keeping the domain name (thepatternbox.com), there is no website at present. You can; however, find my patterns on Loveknitting.com and on Ravelry.com.

I also hope to be adding free patterns right here ... on this blog ... just like I used to back in 2008 when I started the whole thing. 

I have discovered that social-media websites really drain the creative juices right out of me!! I am going to try to spend less time scrolling and more time making and sharing things.

To prove my point, all I have to show for this year is a knitted cap that is much too large and odd-looking for my grandson to actually wear, along with a half-knit sweater. That's it. 


Yes, 2020 was certainly a strange year.

In the early days of the pandemic, last March 2020, we made Irish soda bread because bread and yeast were both very difficult to find.


Then, we decided to plant pumpkins, so we could have them for the fall ... but the squash beetles bored into all four of them and left them rotten on the inside.

Next, I concentrated on making 2-layer masks made of 100% cotton that tied because the elastic for ear loops was difficult to find. It didn't matter that, at that time, everyone said masks didn't mean a thing. They wouldn't help. As the daughter of a registered nurse, I knew this wasn't true. My mom always wore a mask around my kids if, while visiting, she had a sore throat or anything she might consider contagious. Who knew, just a few months later, that masks would become such a hot topic ... and now, wearing them in public is mandated in most places.


From remote schooling one of my grandsons to being a day-time caregiver for another, the spring, summer, and fall of 2020 passed by in a blur.

But here we are, at the end of January of this new year of 2021 and I hope it will be a healthy one for all. Trying to find joy in the little things of every day and sharing that joy with others is (I hope) going to be my mission.


Wednesday, July 17, 2019

Waldorf Birthday Crown and Woodland Cake

 Here is my first attempt at a birthday crown. I started this so many times ... months ago! I finally finished the night before my grandson's 4th birthday! Phew!

I had seen so many magnificent pieces online. Quite a few looked to have been needle felted. While I have tons of roving that I dyed years ago, my first attempt was definitely not up to par! I ended up taking all of it out.

Then, I tried to embroider directly onto the felt, but having chosen such a dark color, the little figures didn't show up very well. So I took all of the embroidery out, too!

Finally, I cut the shapes from felt, then embroidered details, and attached them to the crown with various stitches (some straight, some chain, some blanket). I added a few glass beads and sequins for a little sparkle. It's far from perfect, but ... fortunately, the Birthday Boy likes it just as it is!

I had also seen lots of photos of woodland-themed cakes. Some were really amazing! Mine is very, very simple. The Schleich animal figures are entirely the best part!! I made the Hershey Bar cake, which is really quite rich, so using less of the icing worked out incredibly well. I grated some of the chocolate for the top, trying to resemble "dirt." I had seen another cake where rosemary sprigs stood in for trees ... so, having a huge rosemary plant in our yard, I cut a few sprigs and added them to the background. Because the animals are pretty heavy, I would recommend adding them last ... right before you're going to serve it.


Monday, June 11, 2018

Of Quiet Books, a Quick Room Makeover and Quilting! Part I: Quiet Books

Believe it or not, I've been thinking about writing this post for a very, very long time. It's been such a  long time, in fact, that it's hard to know exactly where to begin. So, I'll just jump in medias res.
With our grandson nearing his 3rd birthday (yes! already!), I find myself obsessed with all things toddler. Toddler classes, toddler education, best toddler bedrooms, best outdoor play spaces, etc.
So ... my next few posts will be about all of my findings and my experiments!
Part I: Quiet Books
Quiet books are certainly not a new concept. My sister has one her mother-in-law made her children back in the late 1970's-early 80's. If you're not familiar with them, they are generally made of cloth and feature page after page of colorful, imaginative activities that will, hopefully, keep a little one quiet and entertained for awhile.
I stumbled upon Pinterest quiet books when Tony was still super small ... spending about two years poring over various pages and YouTube tutorials. Let me tell you, there are some fantastic tutorials and designs out there! Just go to Pinterest and type in "Quiet Book." (I'll also post the links to a few I found especially helpful or amazing.)
Some of them were just too outrageous for me to even contemplate. It was completely intimidating. To top it off, my old, trusty JC Penney sewing machine that I had back in the '80s had completely stopped working. Knowing this, my daughters purchased a Brother SE400 sewing machine for me. But wait! This beautiful machine was nothing like my old one. I was stumped by all the computerized everything! In fact, even after reading the manual, I was petrified to try it. I just put its little dust cover back on and set it aside.
Instead of beginning anything, I just kept collecting more buttons, ric-rac, fabric and ideas. I acquired two very helpful books that I highly recommend. "How to Make Cloth Books for Children: A Guide to Making Personalized Books, No-Sew Techniques" by Anne Pellowski, Chilton Book Company, 1992 and "Quiet Book Patterns: 25 Easy-to-make Activities for Your Children" by Amy Pincock, Plain Sight Publishing, 2013.
I spent endless mornings watching tutorials until one day, my younger daughter said to me, "Mom, you need to stop watching and just do it!" She was right. So, I ended up taking a sewing class at a wonderful quilting shop nearby ... and, although I am far from being a good seamstress, I learned how to use (and appreciate!) my amazing sewing machine. Ta da: I have actually finished my first quiet book!


It only has six activity pages, plus a front and back; however, it's super thick. I added grommets to each page and just threaded a thin grosgrain ribbon through each, then through a button after the last page. I used the layout and mock-up ideas presented in the Pellowski book to help me choose which pages to work on and where to place them. I can't recommend this book highly enough. Although it's old, I found a used copy for sale on Amazon.

Here are the pages:
 1. Button-Under-Tulle Maze

2. Move-Along Vehicles
3. Camping

4. Ocean

5. Mailbox with Letters

6. Emotions

Last Page
What follows are links to the quiet-book pages I used as inspiration and the names of the fabric that I was able to find to replicate them.

Cover Page:

  • Jetsetter Fabric by Dear Stella
  • Race Car Template from "Make! Over 40 Fantastic Projects with 16 Exclusive Designs" by Cath Kidston, St. Martin's Griffin, 2008.
First Page:
  • Bee Hive. I saw this page that I found on Pinterest and thought it was great! I used the Pincock book to help me figure out how to make it. While the book offers 25 patterns of its own, I really just used it for the techniques! It offers a great description of how to attach the tulle. I think these tulle mazes are like magic ... you can't even see the tulle!
  • I affixed the hive to the page with a hand-done chain stitch. I never could master the very tight zigzag that so many quiet-book appliques seem to use. Please ignore the pen line! I initially made the hive too narrow for my bee button! I had to take out my stitches, but, of course, I had used an actual marking pen, so my sketch line remains. Sigh.
  • As it looked a bit bare, I added a little strip of grass at the bottom. I think flowers, clouds or extra little doo-dads on the sides would have been nice, but I was running out of time and energy, so I left it as is.
Second Page:
  • Vehicles. I saw this page  on Pinterest and was obsessed by the fabric with all the buildings and the idea of the moving vehicles! I did image search after image search and finally found the fabric on Etsy! it is called, "City Block" in turquoise by Michael Miller. Doesn't it look like Dutch houses facing canals? I really love it.
  • Somehow I stumbled upon this fabulous website where the author gives very great details about running floss through grommets and objects and attaching with buttons on the back to secure. I used this method, only with elastic cording instead of floss, for each of the vehicles. I tried to replicate the original look as closely as possible.
  • I cut my pieces out of felt, then put grommets in them. Don't look too closely at the sailboat ... it ended up somehow with the wrong side of the grommets to the front. Oh well! It still moves!
Third Page:
  • Camping. There are lots and lots of great camping pages out there! I was taken especially with this one. A tip: be sure your zipper is a separating zipper! I had lots of regular zippers and started working with one, until I realized ... uh-oh ... how will the tent actually open??? Needless to say, I had to google what kind of zipper one needs for a jacket! I had no idea!
  • I added an owl button under the tree's greenery ... and I stitched in a little felt bear inside the tent. Oh ... the tent is lined with another Michael Miller fabric ... Siren Song in Grass.
Fourth Page:


  • Ocean. The page that inspired this is far more complicated and well done than mine, but I still think this easier version is fun. Take a look at the original. And yes, you'll notice it's the same page that has the Vehicles (with the Michael Miller City Blocks fabric) and a ton of other fantastic quiet-book images.
  • I used several different Michael Miller fabrics, as I tried to replicate the original ... so there is just a little strip of the Into the Deep, Mermaid Scales in Aqua at the top, then Into the Deep, Tropical for the middle ... where the submarine is. Finally, I used Sea Buddies, A Sea of Stars in Seafoam at the bottom where I sewed another piece of tulle between two felt and ric-rac borders. I found these fantastic seashell beads for sale on eBay. They are very small and perfect for little fingers to push around. 
  • Examining the photo closely, I tried to replicate the little submarine. I used two pieces of felt, stiffening with fusible pellon and cutting a hole in the top one. I cut a figure from Michael Miller's Monsieur Blocks and sandwiched it in between the felt pieces. I stitched two fabric periscope shapes back to back, after stiffening them up a bit with fusible interfacing. To put it all together, I slipped a long piece of waxed thread behind the figure and had it hanging out when I hand-stitched the submarine pieces together (back piece, waxed thread, fabric man, periscope, front felt piece).
  • Thinking about adding the little window made me way more nervous than I should have been. It really wasn't that bad. I used the technique from Teeny Tiny Mom. She has all kinds of great tips, tutorials and many patterns for sale. I recently purchased her Teddy House, but it will be a while before I can begin that one! Once the plastic was sewn onto a piece of felt, I added the grommets on either side. I threaded the waxed thread from the submarine through the grommets, then used fish beads and knots at the ends. The submarine can move from one end to the other by pulling the thread. I actually love doing this, myself! I added a couple of ric-rac spots on either side, sewing a little button under one and an embellished fabric scrap under the other. 


Fifth Page:
  • Mailbox. The fantastic website Imagine Our Life has all kinds of great quiet-book pages ... all the templates, all the explanations, all the photographs ... and all for free. This is truly an amazing and inspiring website that I visit quite often. I discovered the mailbox page there. Even the flag moves! The mail is so cute! I added buttons to close the mail on the back of each envelope ... and I chain-stitched simple words under animal shapes to the felt letters inside.
Sixth Page:
  • Emotions. I saw this image on Pinterest and then did massive searches to find it. Complete directions for a paper version are from Mr. Printables, here. There is a also a really, really cool wooden version from Moon Picnic. Instead of using paper; however, I cut the pieces out of felt, then attached them to the felt face using the same method for making things move that I had with the mailbox flag. There is a great tutorial about moving clock hands that you can apply to just about anything you want to move. Here is the tutorial: Clock. My Craft / Quiet Book has all kinds of fantastic video tutorials for everything you'd ever want in a quiet book and more! She also has a Facebook Group page where she answers questions and has all kind of information.
So that's it! I used my Sizzix to cut out the animal shapes for the mail and also to cut out the alphabet letters for Tony's name on the cover and the Love, Grammie on the back. I used my Silhouette Cameo to cut out the numbers from heat-transfer vinyl. I then was able to iron on the number 3 on the car in front ... and the date at the back of the book. You could, of course, cut all these out by hand, but my scissor skills are not the best. (That's why the race car's wheels look a bit less than round!)

I learned a lot from this. The first thing I learned is to go for it. My grandson doesn't care if my seams aren't straight ... if the face on the face page isn't flat ... if stitches show or if extra lines are drawn. He might ask, "What's that?" and then I simply reply, "That's where Grammie made a mistake." And that's that!

Also, if you spend as much time as I did (do!) looking at quiet-book pages, you'll see some really amazing ones ... but when you start to plan your book, I suggest that you not become overwhelmed by all the fabulous details. When I was planning this one, I really had to ask myself, "What's the play value in this?" It might be the most intricate, fascinating page, but it might not be all that much fun. The Bee-Hive page and the Emotions page seem to be the most used ... and yet they were, perhaps, the easiest to make.
Stay tuned for Part 2: Quick Room Makeover!

Wednesday, April 26, 2017

The Nursery Rhyme Blocks: Redwork

Stuffed in the back of one of my craft drawers, all folded and yes, just a little bit dusty, were a couple of panels of nursery rhyme quilt blocks. I don't even remember how long ago I bought them! I found them, along with several skeins of Anchor red embroidery floss and a plastic bag with a photo of the finished quilt.

I have so many other projects going right now, but I couldn't help myself. I had to find an embroidery needle, a hoop and get going. Right then. Immediately. I mean, who can resist such charming little scenes?

There's something particularly satisfying about embroidery. Now, I'm not very good at it anymore, but I hope, in time, I will be back up to speed! I started out years and years ago (when I was in 6th grade, actually). A teacher gave us lessons in the lunchroom. I really don't remember why. Maybe it was just something she wanted to do. There was just a little group of us and I was so excited about it! We started out embroidering on burlap. We sketched a design, then used simple stitches to bring it to life. I still remember mine. It was a very colorful, very large snail and I was so very proud of it!

Although there are plenty of blogs and YouTube video tutorials on embroidery stitches, my favorite reference is an old volume from The Betty Crocker Home Library called The Pleasures of Crewel. It's an absolutely fabulous book with lots and lots of photographs and stitches I had never before seen.


For right now, I must put away the new little knitting patterns I'm designing; stop working on the Quiet Book pages for my grandson; finish up the rest of the decorations for the June wedding as quickly as I can; and finally, clean the house. After that, I shall find time to finish this. Yes! I shall!


Wednesday, February 22, 2017

Silver Stars, Sparkling White and Lots of Paper ... Wedding Preparations!


A lot has been going on behind the scenes since my last post! Our eldest daughter got married on February 11 and, thank God, it was a gorgeous day! Although we had nothing to do with the actual reception, we had planned to host an after-rehearsal party at our house for our out-of-town family and the wedding party and friends.
When I started counting up how many people, I realized it would be about 40 guests! There were so many special touches I wanted to include ... and, making our mid-1970's home look nice is always challenging!
I started planning early.
A little background: our daughter has an interest in Japan: the language and the culture. She took Japanese in high school and college and has visited Japan several times. In fact, her husband proposed to her in a little planetarium restaurant in Tokyo. So, silver and navy, stars and Asian-inspired decorations were to be her theme.
From a sweet Etsy shop, she ordered origami flowers for her wedding bouquet and her attendants' bouquets ... and origami flowers for the groomsmen, as well. So, taking this idea, I made a few decorations, myself. I am sharing them here, along with links to the fabulous online tutorials that helped me so much ... just in case anyone would like to use these ideas.

First, she and her husband chose February 11 as their date ... partly because my husband and I had our wedding on February 7 ... and we chose that date because ... strangely coincidentally, both my parents and my husband's parents had chosen February 7!!! How wonderfully weird is that?? My parents were February 7, 1948 and my husband's parents were February 7, 1950 (yes, it was a Tuesday evening for their wedding)!!

We were able to find the original wedding invitations for all, so we framed them and put them on a little table in the hall, along with origami stars.  


I couldn't find navy-blue sparkly paper, but I still think they came out nicely. While there are many tutorials for these stars, I felt this one is really well done and easy to follow: Origami Lucky Stars
If you'd like to use the same sparkly paper I did, I bought it on Amazon.com. Here is a link to it: Glitter Origami Star Paper I found it very easy to work with.

Okay ... so I had the front hall decorated a little and everybody really enjoyed seeing these wedding invitations that they really had never seen before! It was amazing we found them stashed away.

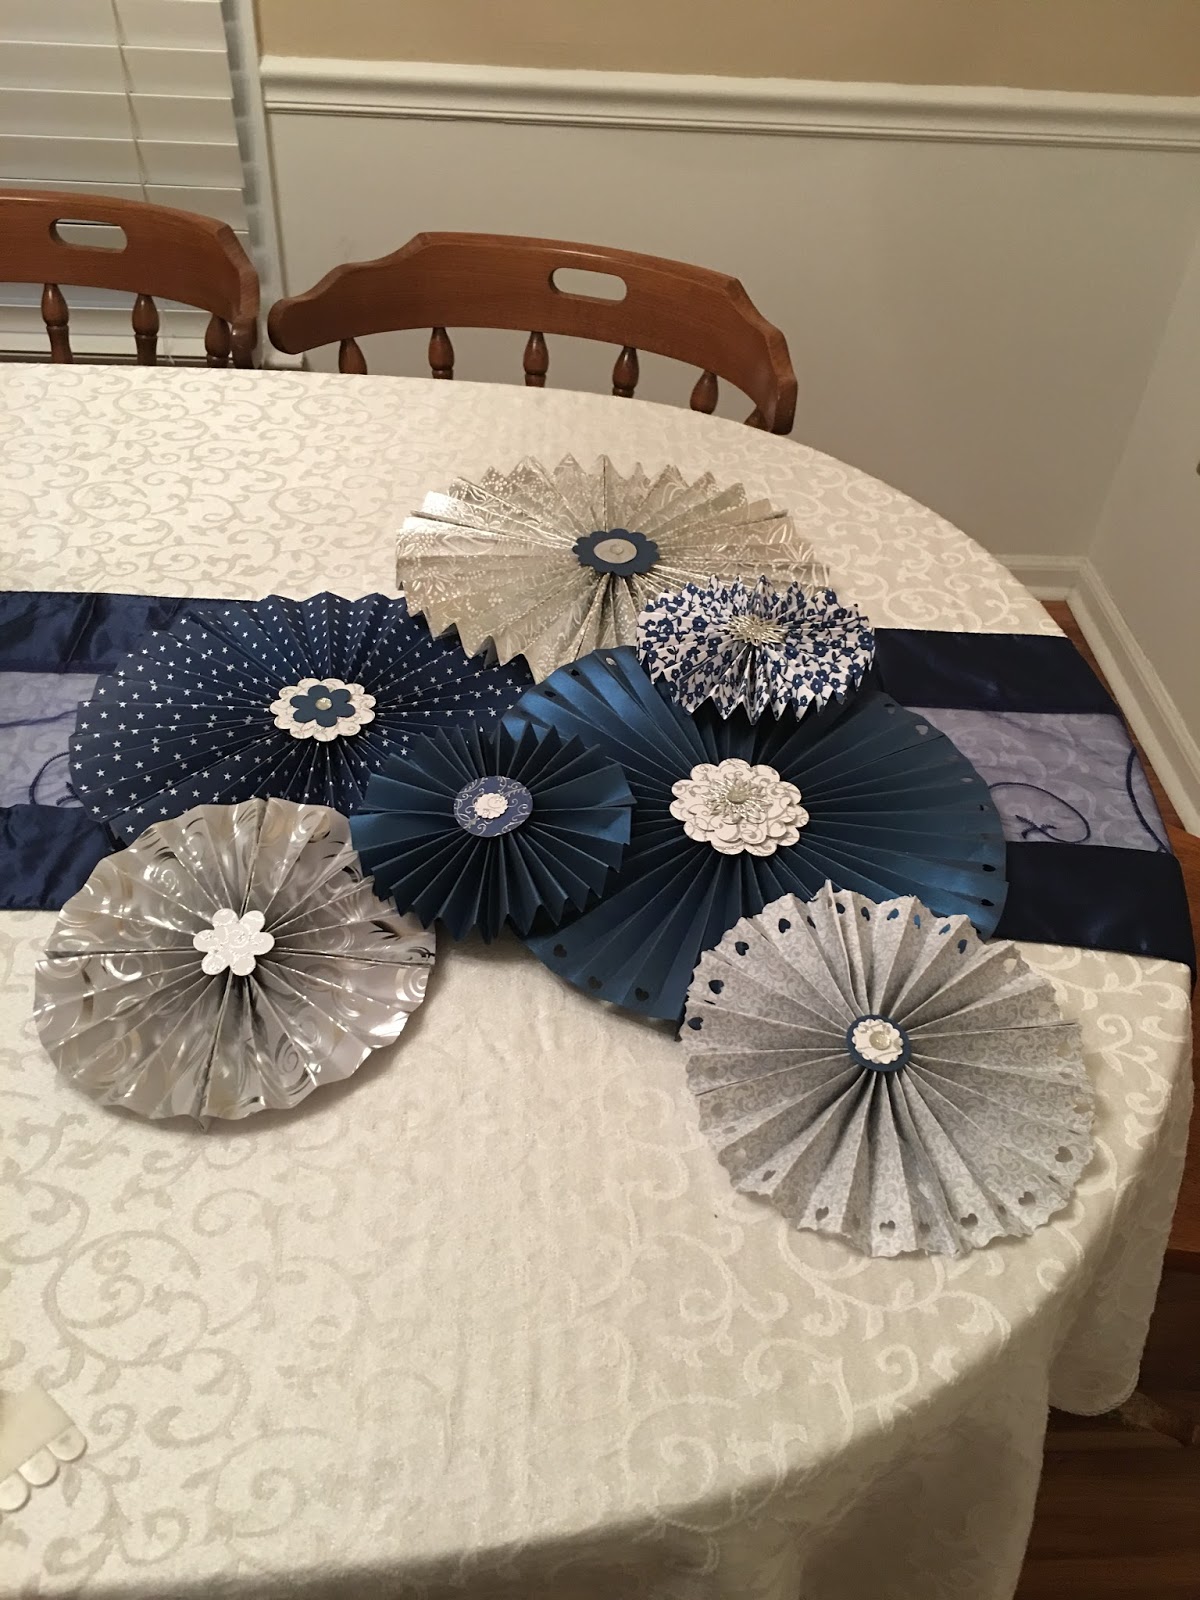
Next, I made paper fans to attach to the wall. Our dining room has a big, blank wall and these fit perfectly! I used lots of different scrapbook papers. They all work pretty well. The majority are card stock, but some actually feel like wallpaper samples! I bought them at Hobby Lobby, AC Moore and Michael's. Basically, wherever they were on sale. You will need quite a few, especially for the bigger fans.
Before attaching them to the wall with 3M Command Strips, I laid them out on the table, then I took a picture of the arrangement so that I could recreate it on the wall. We ended up hot-gluing the smaller ones on top of the larger after we hung the larger ones on the wall.

I tried to use a heart paper punch around the edges of two of the fans, just for something different, but I wasn't too accurate. Don't look too closely!
For the centers, I cut out round pieces of card stock and glued each down, then added another layer on top ... either a flower shape or another circle in a coordinating or contrasting paper. I added a tiny glittery dot on top of that. I also glued a card-stock circle to the center back of each fan to help stabilize it.
There are many, many paper fan tutorials if you do a search on Youtube. The basic idea is simply accordion-pleating paper segments and then gluing the segments together. I used hot glue. It was much faster.
I noticed some people used a whole sheet of paper and stapled it in the middle, as in this tutorial: Stapled Paper Fans and others started with smaller pieces, as in this tutorial: Paper Rosettes. I found those two to be the most straightforward and easy-to-follow videos. Another method uses even smaller pieces of paper: Paper Pinwheels. Whatever method you choose, they all produce the same effect. Varying the size of the papers, obviously, is what makes the end fan (or rosette or pinwheel) larger or smaller.

Another decoration I thought really interesting is the "manzanita" tree or "wishing tree." Whatever name you'd like to call it, it looks like simple branches decorated with hanging crystals. When I looked around for these, I was amazed at how expensive they are! "Why," I said to myself, "I have white latex paint in the shed! And silver glass glitter! I shall make my own!"
So that's what I did. I found an old branch that had blown off a shrub. I'm sure you have a few lying around your yard. Winter is the perfect time to find them. It doesn't have to come from any special tree or shrub. The branches just have to be attractively spaced and they need to be sturdy enough to tolerate holding a little decoration.
I took my branch and laid it on newspaper outside. With a sponge paint brush, I brushed on the latex paint, then, while still wet, sprinkled the glitter on it to make it look like a frosty, sparkling tree. I might not recommend glass glitter, though. Yes, it's lovely, but it is sharp. I cut my fingers in a few spots while turning the branches and sprinkling.

When dry, I put the branch in a vase and filled it partway with little glass stones that are sold in the floral sections of all the craft stores. They didn't have any navy. These were the closest to clear that I could find that day. They actually have a greenish tint, I think.
The ornaments are very easy. I bought a few Swarovski crystal charms (a few hearts and a few teardrops). I also bought a little container of silver bugle beads, a package of end-crimp fasteners, some very fine, 32-gauge wire (but you could use thin string, really) and a strand of glass beads.

I just threaded a crystal with wire, then used a crimp, sliding it down the two ends to hold the charm in place. I then threaded the doubled wire through a bugle bead, a glass bead, etc. You can alternate them any way you'd like. Yes, the wire is so very thin that, even doubled, it can pass through the bugle beads. After I made the ornament as long as I wanted, I used another crimp fastener, then made a loop of the wire for hanging. I twisted it around several times to secure it, then cut the ends with a wire cutter.

Here is the tutorial I used to help me: Jewelry Christmas Ornaments

I decided I wanted a couple of vases of origami flowers to echo the bouquet my daughter had ordered. I mixed in some silk flowers, as well.


I used the same papers I had used for the fans, so that it would all kind of coordinate. It took a bit of practice. I found these tutorials the most helpful: Origami Kusudama Flowers and Origami Iris
I used hot glue to hold my Kusudama petals together.

After these decorations were completed, I started thinking about what to do with the paper napkins and disposable utensils ... how could I possibly make them look good?

Well, I found a great paper-napkin folding tutorial here: Folding Paper Napkins. Luigi Spotorno shows many excellent ways to fold a paper napkin, but the one I wanted for this event begins at 3:21 on his video. This man is really a great teacher!

I purchased these silver-and-white napkins at Party City. Using grosgrain ribbon, a little bit of silver-bead string, a couple of heart charms and a glue gun, I was able to make little napkin-ring like decorations. I think they came out pretty well.

I used Mr. Sportono's folding method, then measured the folded piece all the way around. I cut both a strand of the beads and the ribbon to this length. I hot-glued the ribbon at the back. I then threaded one of the heart charms onto bead strand, then wrapped this around the ribbon. I hot-glued it at the back, as well.


I didn't fold my paper napkin quite as long as the knife; however, I think the utensils still fit nicely into the little pocket.
Once those were made, I put them all aside. I then had a bit of a dilemma when I thought about the guests actually eating. Although we were serving a simple buffet of assemble-yourself deli sandwiches, we don't have enough room for everyone to have a place at a table to eat. I have never liked juggling a glass, along with my plate. The solution: trays from Ikea!
I purchased these Smula trays, which I found very economical, then bought paper doilies to fit over top. The paper plates and the utensils fit nicely. There was even room for a glass. The best part? The trays sat neatly on laps, and there were no drinks set down on the floor!
We decided for dessert we would have a groom's cake. My daughter's husband is a League of Legends fan, as well as a German-chocolate cake lover. So, I decided to make a German-chocolate sheet cake with his favorite character on top! Amumu!
Because one of the guests has a tree-nut allergy, I did not make the typical pecan-coconut icing. I filled the cake with a modified version, leaving out the nuts. And, because we wanted Amumu to show up in all his glory, I iced the cake in chocolate first, and smoothed it out. Using piping gel, I traced a picture of Amumu, put it on the cake and then filled in with piped icing.
We modified cake pulls a little to be non-gender specific, as we wanted the entire wedding party to be able to participate. So, before icing, I placed the charms under the cake, the ribbons hanging out. I was able to pipe a shell border right over the ribbon.
Everyone thought the cake tasted really good! And the groom certainly enjoyed seeing Amumu!
All in all, the party was a great success. Phew!
Now, onto making the decorations and planning for my son's wedding ... scheduled for this June!

Friday, December 9, 2016

Frosty on the Outside, Warm on the Inside!


Share the spirits of the season with this whimsical snowman bottle cover! 
Knit in the round on double-pointed needles, then fulled in the washing machine, this sturdy cover is as practical as it is fun. 
A cleverly concealed insert knit within the head fits perfectly over the top of the bottle. 
It makes a unique gift cover for most 11-12-inch bottles (wine, liquor or sparkling ciders).

The free pattern is available as a pdf download at The Pattern Box shop! You can also find it on Ravelry.

I'll be posting more photos and how-to details soon!